
How pedal maintenance works: a complete cyclist's guide
- Guy Soper
- 4 days ago
- 9 min read
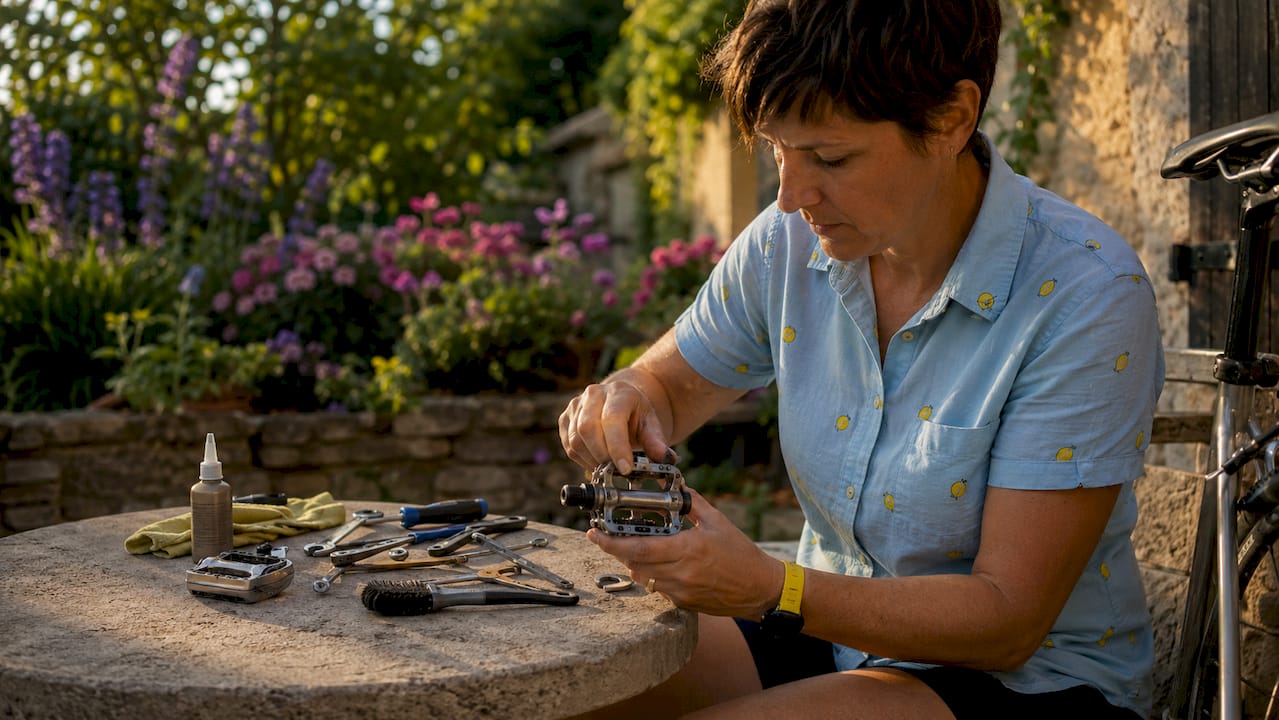
Pedal maintenance is the process of inspecting, cleaning, lubricating, and adjusting a bike’s pedal bearings and interface components to keep them spinning smoothly and lasting longer. Neglect it, and you will feel the consequences long before you see them: grinding resistance, annoying clicks, and eventually a seized spindle that damages your crank arm. Whether you ride a Shimano SPD clipless setup, Look Keo road pedals, or flat platform pedals on a Voodoo Bizango mountain bike, understanding how pedal maintenance works is the difference between a component that lasts years and one that fails mid-ride. A typical DIY bearing service takes around 20–40 minutes per pedal. That is a small investment for a significant gain in reliability.
How pedal maintenance works: bearing types and what they mean for you
The bearing type inside your pedal determines everything about how you service it. Get this wrong and you will either waste time trying to repack a sealed unit or miss the chance to save a serviceable pedal with a fresh grease job.
Cup-and-cone bearings use loose ball bearings sitting in a cup-shaped race, adjusted by a cone nut and locked in place with a locknut. You can fully disassemble them, clean out old grease, inspect the races for pitting, repack with fresh grease, and set the preload. Sealed cartridge bearings, by contrast, are self-contained units. You press them out and replace them rather than servicing the internals.
Feature | Cup-and-cone bearings | Sealed cartridge bearings |
Serviceability | Fully serviceable | Replace rather than repack |
Tools required | Cone wrenches, locknut spanner | Bearing puller, press or drift |
Maintenance cost | Low (grease only) | Higher (new cartridge needed) |
Common on | Older and budget pedals | Modern clipless and platform pedals |
DIY difficulty | Moderate | Low to moderate |
Shimano SPD pedals often use cup-and-cone systems, which is why they have such a long service life when maintained properly. Many modern sealed pedals from brands like Crankbrothers use cartridge bearings that simply press out and in. Identifying your bearing type before you start is the single most important step in any pedal repair guide.
Pro Tip: Lay a clean white cloth on your workbench before disassembling cup-and-cone pedals. Tiny loose ball bearings are easy to lose, and mixing balls between left and right pedals can permanently affect bearing smoothness.
How do you diagnose common pedal problems?
Pedal faults tend to announce themselves through three main symptoms: clicking, grinding, and lateral wobble. Each points to a different root cause, and rushing to replace parts without a proper diagnosis wastes both time and money.
Start with a simple spindle test. Remove the pedal from the crank arm and wiggle the spindle laterally with your fingers. Any side-to-side movement indicates worn or dried bearings. Spin the spindle by hand and listen for roughness or feel for notchiness. Either symptom confirms bearing wear.
Clicking is the trickiest symptom to diagnose because it rarely has just one source. Before blaming the bearings, work through this list:
Check the pedal threads in the crank arm for contamination or damage.
Inspect the cleat interface on clipless pedals for dirt, corrosion, or worn engagement surfaces.
Tighten the crank arm bolts to their specified torque.
Wiggle the spindle to test for bearing play.
If the click persists after all pedal-side checks, investigate the bottom bracket or frame joints.
A pedal click that persists after you have checked every pedal-side component often originates from the bottom bracket or frame. That distinction matters because replacing pedal bearings will not fix a bottom bracket problem.
Pro Tip: Reproduce the click on a stand before you start dismantling anything. Note whether it happens under load, at a specific point in the pedal stroke, or only in certain gears. That pattern narrows the cause quickly.
Step-by-step guide to servicing your pedals
Proper pedal servicing follows a clear sequence. Skipping steps, particularly around thread direction and torque, causes more damage than the original fault.
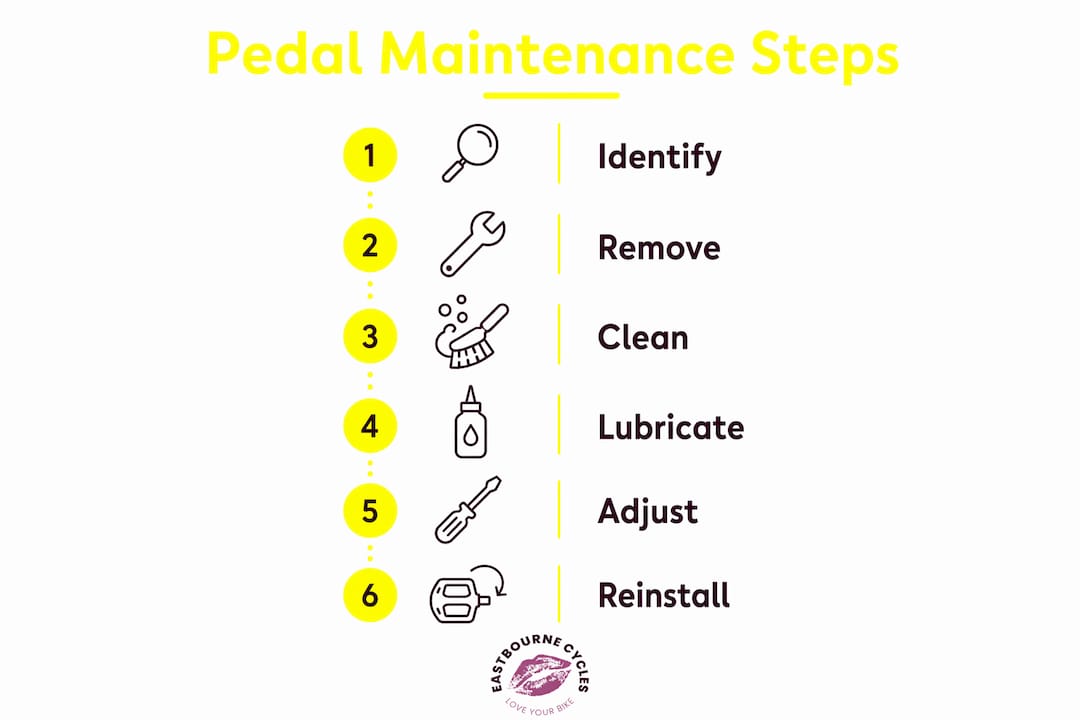
Removing pedals safely
Left and right pedals use opposite thread directions. The right pedal tightens clockwise and loosens anticlockwise. The left pedal tightens anticlockwise and loosens clockwise. Getting this wrong strips the crank arm thread, which is an expensive mistake. Use a 15 mm pedal spanner or a 6 mm hex key in the back of the spindle. Apply firm, steady pressure rather than sudden force.
Cleaning the pedal body and spindle
Once removed, clean the pedal body with a mild degreaser and a stiff brush. Avoid soaking sealed pedals in solvent, as this draws old grease out of the seals. For platform pedals, clean around the pins and check each one for damage or looseness. A toothbrush works well for getting into tight spaces around the spindle base.
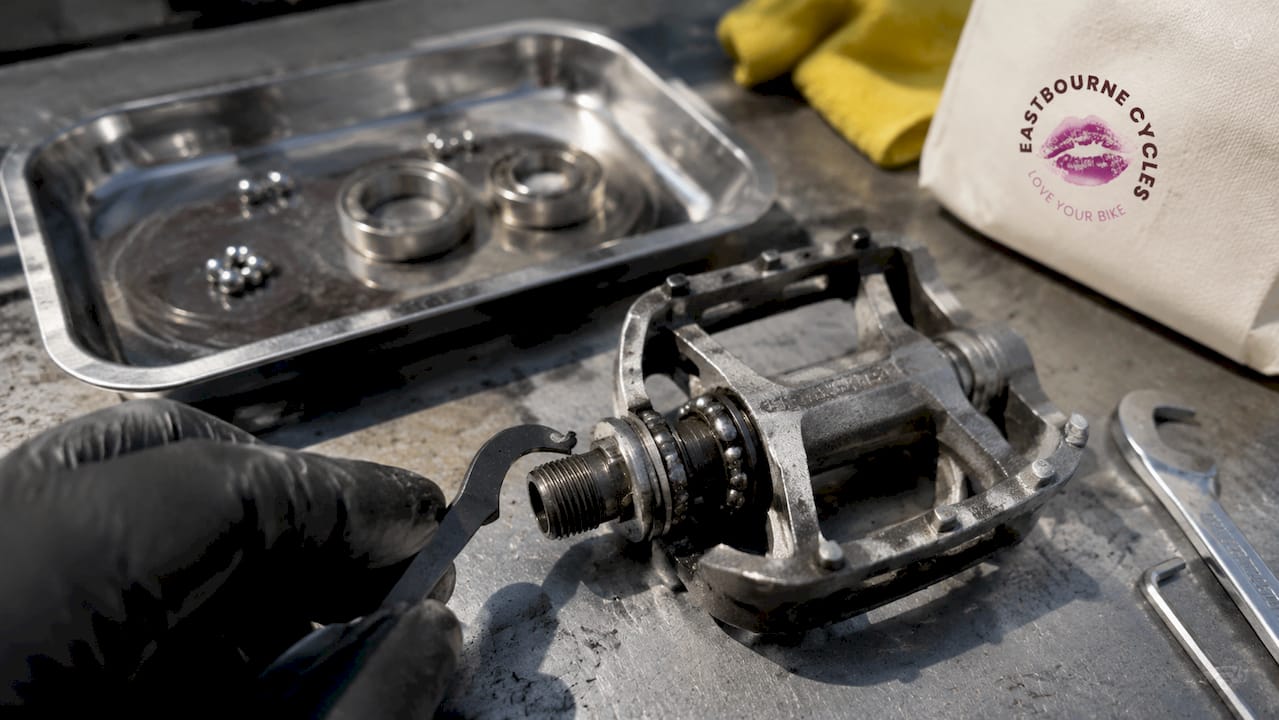
Servicing cup-and-cone bearings
Follow these steps for a full cup-and-cone service:
Remove the dustcap from the outer end of the pedal.
Unscrew the locknut using a thin spanner, then unscrew the cone.
Slide the spindle out carefully, keeping the loose ball bearings on the cloth.
Count the balls and note their size before cleaning.
Wash all metal parts in a mild degreaser and dry thoroughly.
Inspect the cup and cone surfaces for pitting or scoring. Replace if damaged.
Pack the cup with fresh bearing grease and seat the ball bearings into it.
Reinsert the spindle and thread the cone down until there is no play but the spindle still spins freely.
Adjust bearing preload so the spindle rotates smoothly with no lateral wobble, then lock the cone in place with the locknut.
Replace the dustcap and test by spinning the spindle by hand.
Overtightening the cone causes roughness. Leaving it too loose allows play. The correct feel is free rotation with zero side movement.
Replacing cartridge bearings
For sealed cartridge pedals, use a bearing puller or a suitable drift to press the old cartridge out. Clean the housing, press the new cartridge in squarely, and reassemble. Serviceable platform pedals can gain up to two extra seasons of life from a bearing repack. Sealed pedals that cannot be serviced internally simply need a new cartridge.
Reinstalling pedals
Apply a thin layer of grease or anti-seize compound to the pedal threads before reinstalling. Tighten pedal spindles to between 35 and 55 N·m. Under-torquing allows the pedal to work loose under load. Over-torquing risks damaging the crank arm thread.
Pro Tip: Grease the threads every time you reinstall pedals, even if they feel fine. Aluminium crank arms and steel spindles can seize together over months of riding, making future removal very difficult.
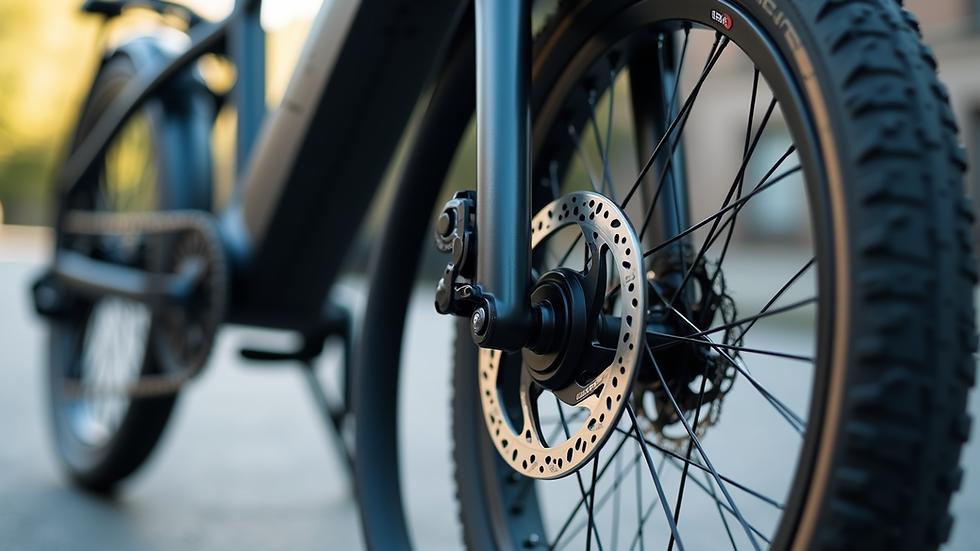
E-bike pedal maintenance: what is different?
E-bike pedal maintenance follows the same core principles as standard bike care, but with additional precautions around water ingress and electrical components. The motor housing and battery connections sit close to the pedal area on most mid-drive systems, including Bosch and Yamaha units. You can read more about protecting these systems in the e-bike maintenance guide from Eastbournecycles.
High-pressure water sprays force water past bearing seals and into electrical connectors, accelerating bearing failure and risking short circuits. Use a bucket, sponge, and mild soap instead. Rinse gently and dry the pedal area thoroughly before riding.
Maintenance intervals for e-bikes differ slightly from standard bikes because the motor adds torque through the drivetrain, increasing wear rates:
First check: at 0–500 km to catch any early issues after bedding in.
Regular service: every 1,000–2,000 km, covering pedal bearing inspection and cleaning.
Annual service: a full strip-down at around 3,000–5,000 km or once per year, whichever comes first.
E-bike pedal bearings wear at a similar rate to standard bikes, but the consequences of neglect are amplified because the motor pushes more force through the drivetrain. Catching bearing wear early on an e-bike prevents knock-on damage to the motor housing and crank interface.
Pro Tip: After every wet or muddy ride on an e-bike, wipe down the pedal area and spin each pedal by hand. You will notice roughness or resistance long before it becomes a serious problem.
Best practices for pedal-cleat interfaces and torque
Clipless pedal systems depend on a clean, correctly torqued interface between the cleat and the pedal body. Contamination at this interface causes micro-movements, which produce noise, accelerate wear, and make engagement feel inconsistent.
Cleaning the cleat mounting surface and the pedal engagement area removes road salt, mud, and grit that cause these micro-movements. Use a stiff brush and mild cleaner on both surfaces. Inspect the cleat for wear indicators. Most Shimano SPD and Look cleats have wear lines moulded in. Replace the cleat before it reaches the wear limit.
Key torque and maintenance points for cleat interfaces:
Cleat bolt torque: tighten to 8–10 N·m in a star pattern to distribute clamping force evenly.
Pedal spindle torque: 35–55 N·m depending on the manufacturer’s specification.
Threadlocker: apply medium-strength threadlocker to cleat bolts if they repeatedly work loose.
Spring tension: lubricate the release springs on clipless pedals with a light oil to maintain consistent engagement and release.
Inspection frequency: check cleat bolt torque every 4–6 weeks during regular riding.
Component | Torque specification | Notes |
Pedal spindle | 35–55 N·m | Apply anti-seize to threads |
Cleat bolts | 8–10 N·m | Tighten in star pattern |
Crank arm bolt | Manufacturer specified | Check before diagnosing pedal click |
Uneven cleat bolt torque causes the cleat to rock slightly with each pedal stroke. That rocking wears the cleat and pedal engagement surfaces faster than normal use would. A torque wrench is not optional for this job. It is the right tool.
Key takeaways
Pedal maintenance requires identifying the bearing type, cleaning and lubricating correctly, and torquing all components to specification to prevent wear and extend pedal life.
Point | Details |
Identify bearing type first | Cup-and-cone bearings are serviced; sealed cartridges are replaced. |
Diagnose before replacing | Wiggle the spindle and check threads, cleats, and crank bolts before assuming bearing failure. |
Use correct torque | Pedal spindles need 35–55 N·m; cleat bolts need 8–10 N·m in a star pattern. |
E-bikes need gentle cleaning | Avoid pressure sprays near motor and bearing seals; use a sponge and mild soap. |
Service intervals matter | Service pedals annually for road riding, every 3–6 months in wet or muddy conditions. |
What I have learned from years of pedal servicing
The most common mistake I see is riders waiting until something breaks before they look at their pedals. A pedal that clicks for three months before it is brought in for service has usually worn its bearing races to the point where repacking is no longer enough. Early intervention saves the component. Late intervention saves nothing.
The second mistake is mixing up left and right pedal parts during a cup-and-cone service. I always use separate labelled containers for each side. It takes thirty seconds to set up and prevents a frustrating reassembly where the bearing feel is never quite right.
For high-end pedals like Shimano Dura-Ace or Time ATAC, I would always recommend professional servicing unless you are confident with bearing preload adjustment. The tolerances are tight and the parts are expensive. For everyday SPD commuter pedals, a DIY service every six months is entirely achievable with basic tools and a clean workspace. Knowing how often to service your bike helps you build pedal care into a broader maintenance routine rather than treating it as a one-off task.
Routine cleaning after wet rides is the single highest-return habit you can build. Five minutes with a cloth and a brush after a muddy session extends bearing life more than any premium grease.
— Guy
Pedal servicing at Eastbournecycles
If your pedals are clicking, grinding, or showing any sign of bearing wear, the team at Eastbournecycles can help. With over 12 years of experience and direct relationships with manufacturers including Bosch, Shimano, and Yamaha, Eastbournecycles offers expert bike and e-bike repairs for both traditional and electric bikes.
Whether you need a full pedal bearing service, a cleat replacement, or a comprehensive annual check, Eastbournecycles provides transparent pricing, genuine parts, and a 4.7-star Google rating that reflects consistent, reliable work. Book your service online and get your bike back on the road quickly, without the wait.
FAQ
How often should I service my bike pedals?
Service pedals once per year for everyday riding, and every 3–6 months if you ride regularly in wet or muddy conditions. Address any clicking or grinding immediately regardless of interval.
What tools do I need for pedal maintenance?
A 15 mm pedal spanner or 6 mm hex key handles removal. Cup-and-cone servicing requires thin cone wrenches and a locknut spanner. Cartridge bearing replacement needs a bearing puller or drift and press.
Why do my pedals click when I pedal?
Clicking usually comes from worn or dry bearings, loose pedal threads, contaminated cleat interfaces, or loose crank arm bolts. Wiggle the spindle laterally to check for bearing play as a first diagnostic step.
Can I service sealed cartridge pedal bearings myself?
Sealed cartridge bearings are replaced rather than repacked internally. Press the old cartridge out, clean the housing, and press a new cartridge in. The process is straightforward with the right tools.
Is pedal maintenance different on an e-bike?
The core process is the same, but e-bike owners must avoid high-pressure water sprays near the motor and bearing seals. Use a sponge and mild soap, and follow the recommended e-bike service intervals of every 1,000–2,000 km for regular checks.
Recommended

Comments